
Pro Tips For Transplanting Tomato Seedlings
As an Amazon Associate and member of other affiliate programs, I earn from qualifying purchases.
To some, it may seem like an extra step, but transplanting tomato seedlings actually helps them develop a stronger stem and root system. Transplanting seedlings doesn’t take very much time, and it’s super easy to do.
Transplanting Tomato Seedlings
There are several reasons why we make the extra effort to start our seedlings in very small containers and repot them at least once before they go out into the garden.
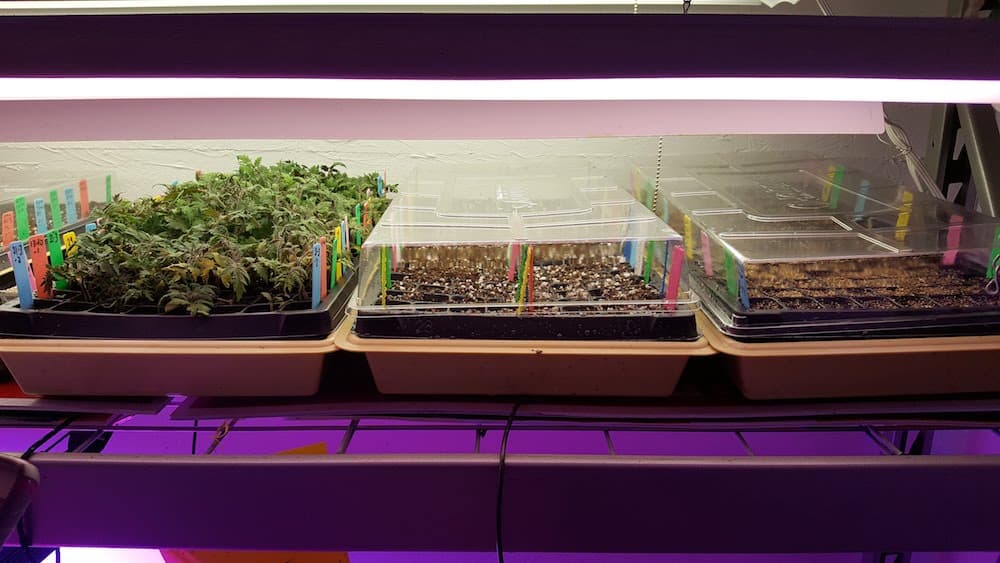
Small celled seed starting trays
It’s easier to get ideal temperature and moisture conditions for starting tomato seeds in the small cell trays. When we start in a 128 cell tray, we can fit more plants in less space which is convenient for placing them on heat mats and under lights.
There’s no fertilizer in germinating mix.
We start seeds in a soilless mixture that contains no nutrients. We don’t want them to stay in that until planting, so we transition them from the soilless mix to potting soil to garden soil.
The transitioning in soil type and container size encourages root growth. So transplanting helps the seedlings build a stronger root system which makes for healthier plants in the garden.
When to transplant tomato seedlings
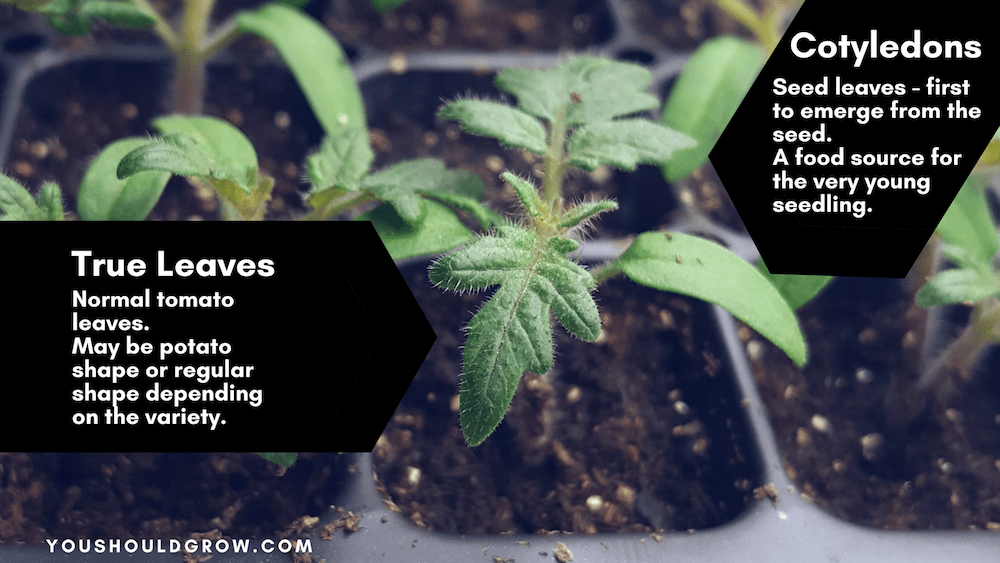
Tomato seedlings are ready to be transplanted when they have their first set of true leaves or at least 2 sets of leaves. Depending on the variety, they can be 2-4 inches tall at this stage.
Waiting too long to transplant seedlings can lead to yellowing of the leaves and roots that grow around the edges of the container and even out the holes.
If you realize you’ve waited too long, don’t worry. You can still save them by transplanting, but the longer they stay in their starting container the more they’ll struggle.
How to transplant tomato seedlings
① Get a container at least twice as large as the original container. Your seedling should have a good inch of space all around it when it’s in its new home.
② Fill a bowl or bucket with a 50:50 blend of seed starting mix and potting soil. Wet it until it is evenly moist and holds its shape when squeezed in your hand.
③ Fill the new container with your soil mixture and make a hole in the center nearly down to the bottom.
④ Loosen your seedling from its container. If there’s a hole on the bottom poke a pencil up there or gently squeeze around the container to help it slip out. It’s easier to remove seedlings from seed starting trays when they’re dry, so don’t water just before you transplant.
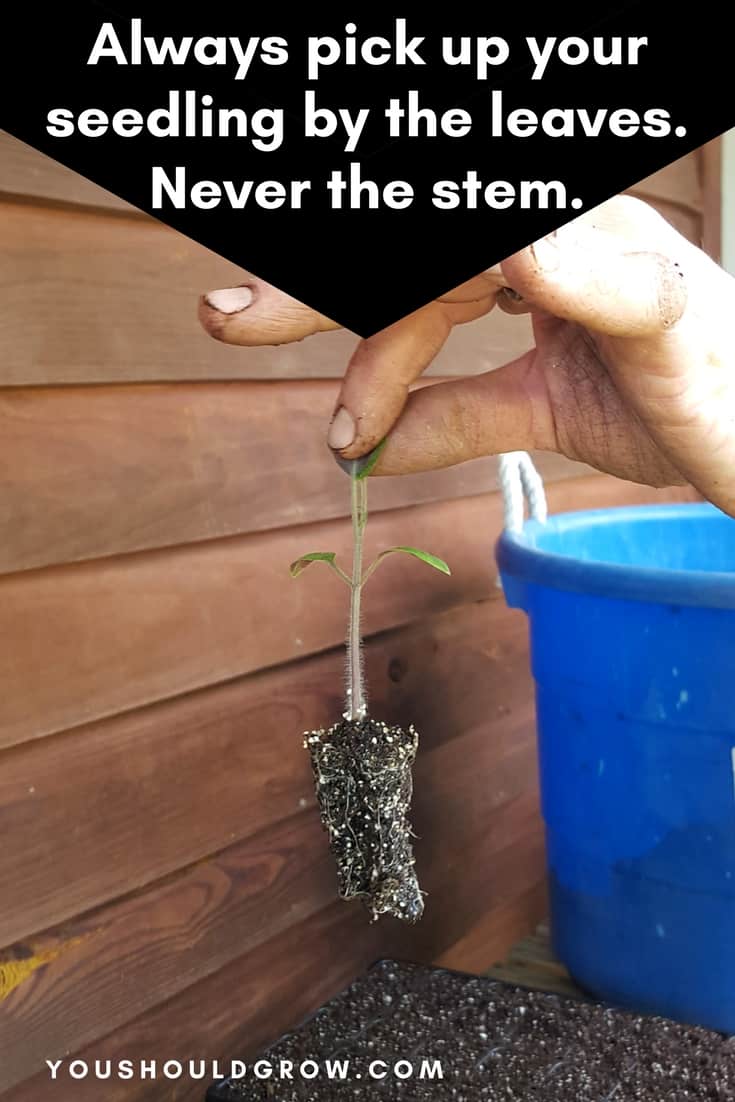
⑤ Pinch two of the true leaves together and pull to lift your seedling out of its container. Pinching the stem can damage the vascular supply in it or even kill your seedling. Trust me, it’s okay. Pull them out by the leaves.
⑥ Set your seedling into the hole in the soil in the new container.
⑦ Tomatoes like to have their stem buried, so put your seedling in as deep as you can with at least 1 set of true leaves above the soil surface. Pinch off any leaves that will be buried.
⑧ Fill in around the seedling with soil mix and press firmly. You want to remove any air pockets in the soil.
⑨ Water it well and set it back under the lights.
When you’re transplanting tomato seedlings into bigger pots, you will sometimes notice that they wilt after you move them. It can be a little stressful on the plants especially if you missed some waterings.
If they wilt after you transplant them, make sure you water them well and move them away from the light for a day. Once they perk back up, you can move them back under the lights.
Caring for transplanted tomato seedlings
After transplanting, continue to care for your seedlings as you did before transplanting. They’ll need at least 2 weeks to adjust to their new containers before you put them out in the garden.
If you want really lush strong plants, give them a half dose of organic liquid fertilizer (this one is the bomb!) every 5-7 days while they’re still indoors.
Next steps
Your tomato plants need to hang out in their new containers for at least 2 weeks before you plant them out in the garden. During the last week or two before your last frost, you’ll need to start hardening them off.
Ready for the next step? Let’s talk about how to harden off tomato seedlings!
Do you go to the effort of transplanting tomato seedlings?
Let me know in the comments!


How long do I keep the heating pad on under my starter tray? The seedlings are now about 3″ high, I have them beneath a 4 foot grow light close to the light to keep them from getting leggy. They are in our basement where it is usually 64 to 67 degrees Fahrenheit at his time of year, mid April. The top of the “Jump Start Germination Station” is off as they are too tall for the cover. This is my third season of starting Italian Heirlooms and this year I added eight Roma seeds I kept from some very nice Romas purchased at the local Farmer’s Market here in Milwaukee. I have had no problems but wondered about the heat and do I still need it now that they’re started. Thanking you in advance, John
Hi, John! You can take them off the heat matt now. We usually take them off when all have sprouted or the maximum time for sprouting has passed. Sounds like you’ll have a beautiful tomato harvest!
Is there a good age/height for tomato plants before putting them in the garden?
Hi, Suzette! Ideally around 8 weeks, but you can put them out a little earlier or later.
Hi ! Thanks for the great article. I had no idea you could or SHOULD grab these little beauties by the leaves lol My question is, I cut off some suckers from my Roma & Amish Paste & have them in Little 4 pack starter cups. How long before I can out them in the ground ? Do you think a few weeks would suffice ? Thanks !