
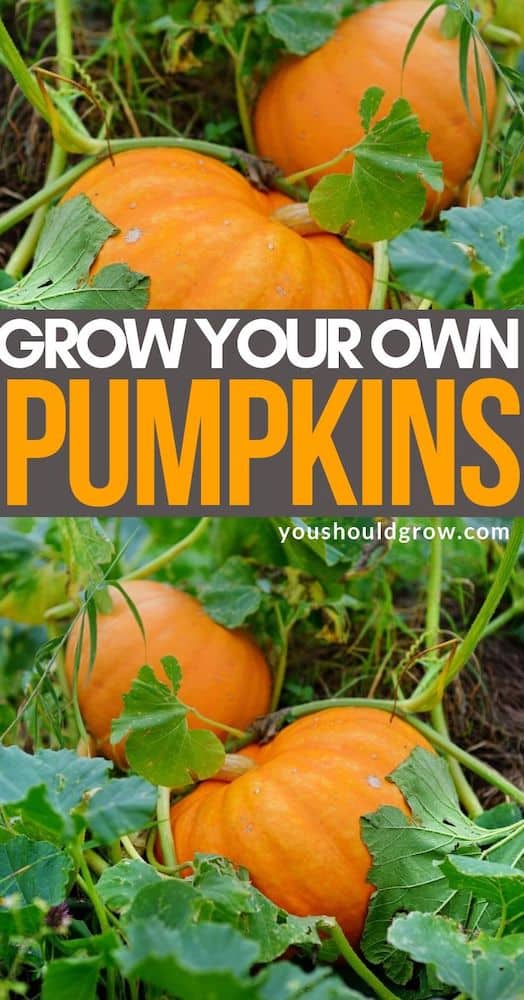
How To Grow Winter Squash & Pumpkins
As an Amazon Associate and member of other affiliate programs, I earn from qualifying purchases.
Growing winter squash and pumpkins is super rewarding. Pumpkins are not only great food, but they are also beautiful to use in your fall decor. There are truly dozens and dozens of plants to try, and you’ll be surprised at the variety among winter squashes.
Growing winter squash is not really different from growing summer squash, but there are a couple of things to remember about winter varieties.
Growing Winter Squash And Pumpkins
Winter squash is called winter squash because the squash fruit will store without special treatment for several months. So squash harvested in late summer can be eaten in winter. This makes pumpkins and squashes perfect if your goal is to grow your own food year round.
When to plant pumpkins
Winter squash seeds should be planted directly in the ground in the spring – at least 4 months before your first frost date. Here in zone 8 our first frost is usually early November, so I had plenty of time starting the seeds in late May.
Thinking of winter squash as a fall crop, it is easy to forget to set them out in early spring, so don’t make that mistake! Choosing the right time to plant is absolutely necessary as large pumpkins can take several weeks to ripen completely.
Where to plant winter squash
Squashes love the sun, so make sure to choose a location that gets 6-8 hours of sun. Also make sure to plant them where they’ll have lots of space to grow. Most winter squash and pumpkins are very large vines.
Seriously. Give them lots and lots of space.
A common way of planting winter squash is in groups of 3. Poke 3 seeds about an inch into the soil, and each vine will grow out in a different direction from one central point.
Tips for best success
Watering ➜ squashes need water to make fruit. There’s no one right answer to how much water they need. Just make sure your plants get at least an inch of water per week (more if it’s really hot). And don’t let them dry out.
Fertilizing ➜ large plants need lots of food. Again, there’s not an exact science to this. Watch your plants and see how they’re doing. Yellow leaves, few flowers, and poor fruit set are signs they’re struggling. As a general rule, give your plants a balanced fertilizer at planting and then once every 2-4 weeks or as needed.
Weeds ➜ When the plants are larger, they’ll be less tender, but at first you need to keep weed competition to a minimum. Use cardboard boxes, newspaper, or your favorite mulch to cover the ground around your pumpkin plants.
Companion planting for pumpkins
I’ve grown pumpkins with with everything from tomatoes to watermelons and never had any trouble. The biggest factor is really spacing. Once your squash plants get large, it can be hard to get to the other plants in your garden.
Flowers are actually the best companions for winter squash. Your favorite flowers are a great choice, but the following plants are great choices to grow with winter squash plants.
● Nasturtium – this beautiful colorful flower may help repel squash bugs. It’s also perfect for topping salads!
● Marigold – flowers don’t get any easier to grow than marigolds. Their strong scent may also repel bugs.
● Radish – super easy to grow and said to repel squash bugs.
● Tall crops like corn and sunflowers – perfect for fitting more plants in a small area
Pollinating Winter Squash Flowers
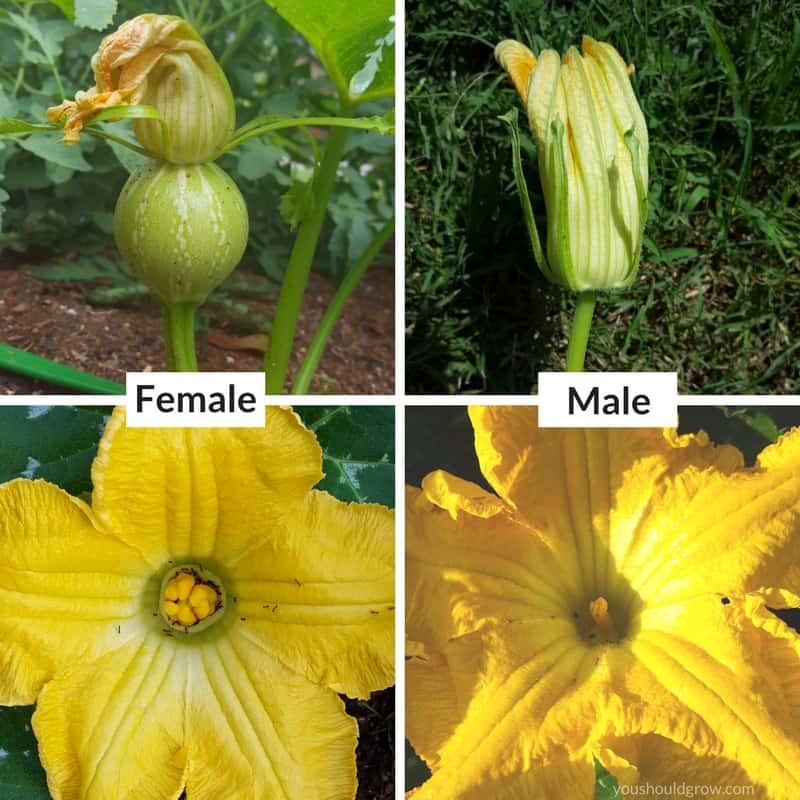
Squashes make male and female flowers that are not self-pollinating. So they must be pollinated by hand or visiting pollinators to make fruit. That alone is a great reason to plant some flowers around your pumpkin patch.
The first flowers you see on your squash plant are usually male flowers. I’m guessing that the plant is showing off a little to start to attract bees and butterflies. Later as female flowers that require much more energy appear, they’re more likely to be pollinated by bugs.
If your squash isn’t setting any fruit, it could be time to hand pollinate.
To hand pollinate your fruit, simply identify a male flower and a female flower. Snip off the male flower and remove the petals. Swirl the stamen of the male flower around inside the female flower, and you’re good to go!
Problems Growing Winter Squash
Unfortunately, winter squash and pumpkins are frequently plagued by pest and disease. Here are some of the most common issues encountered and what you can do about it.
➜ No fruit: this is usually due to poor pollination. See above for tips on hand pollinating squash.
➜ Squash bugs: these hideous pests cause brown leaves, stunted growth, and are difficult to manage. Hand-picking and companion planting are the best organic choices. Horticultural oils will work on the young nymphs but must be reapplied often.
➜ Vine borers: Sudden wilting of your squash plant can be caused by small caterpillars that bore into the base of squash plants. You might be able to save your plant if you remove them carefully with a knife.
➜ Powdery mildew: A white powdery fungal growth that sets up shop on your squash plant leaves. Prevention is better than treatment, so if you know you’ve had PM before, pretreat your plant with organic methods of control.
Get complete tips for dealing with squash pests and diseases in this post.
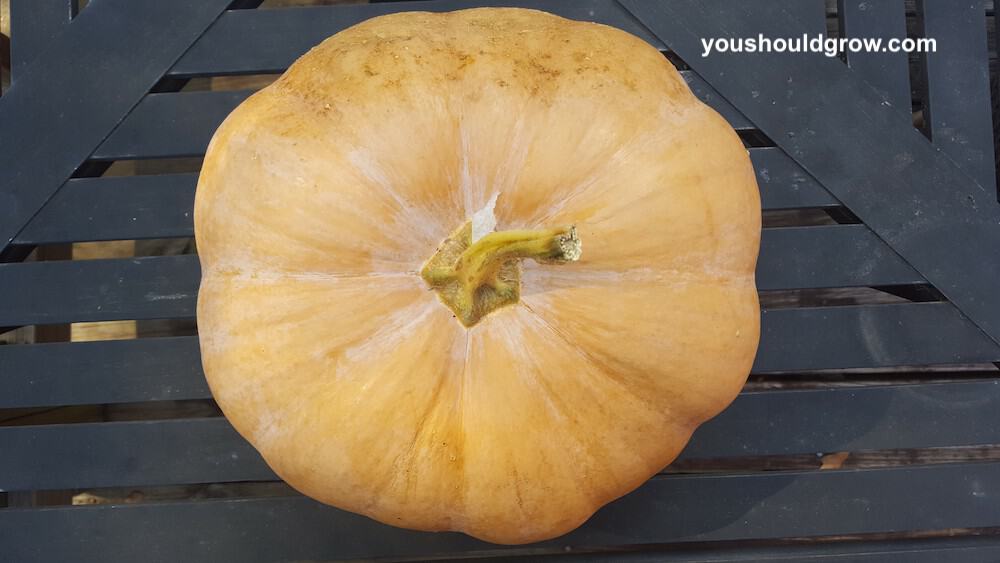
When To Pick Your Pumpkins
For the best flavor, allow the squash fruit to ripen on the vine. You’ll know it’s time to pick your pumpkins when the vine starts to shrivel up and die and the stem of the squash is hard.
Double check your timing by pressing on the skin with your fingernail. If you break the skin of the squash, it’s not ready.
Here are some more tips for picking winter squash:
● Acorn, dumpling, and delicata squash will get a signature orange spot on the ground side when they are ready.
● Always cut (never break) the vine and leave 2 or more inches of stem on the fruit. Pulling the stem off will make the fruit susceptible to molding.
● Never carry the squash by the stem. It’s likely to break off and could ruin your harvest.
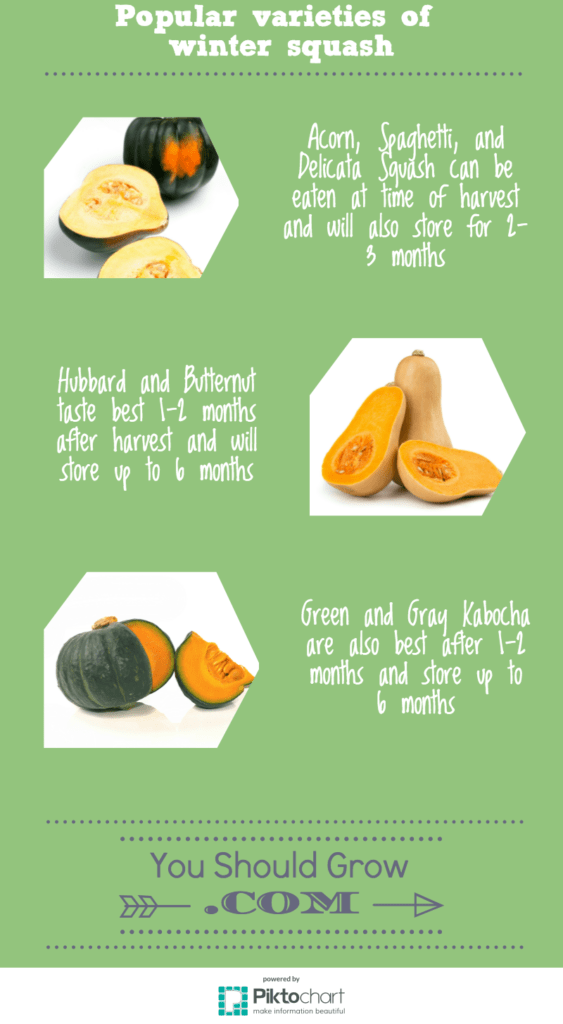
Curing Winter Squash
Some winter squashes are suitable for consumption at the time of harvest. Others should be stored to sweeten and yummy up for 1-2 months. So which need curing and which need storing?
I like this handy curing and storage chart at Johnny’s Seed.
If you need to cure your winter squash, don’t worry. It’s very simple to do. Curing is simply the process of allowing the skin and rind of the fruit to harden so that the edible meat inside is safe during storage.
Curing is easy but takes time. Allow the squash to sit in a warm, dry space, out in the sun or in a greenhouse, for 2 weeks. Larger squash should be rotated and allowed to cure for another 2 weeks.
How To Store Winter Squash
● Look for a cool dry area, like the basement or a closet, to store the squash.
● Make sure to store them up off of the ground. Never pile them on top of each other as this can cause bruising and invite mold and rot.
● Check them every couple of weeks to make sure none have soft icky spots or have been chewed by a hungry rodent.
● When kept properly, butternut, hubbard, and kabocha squash can store up to six months. Acorn, spaghetti, and delicata squash can store up to three months.
Winter Squash Recipes
Okay, so growing this squash is great and all, but what about eating it? Isn’t that important, too? Heck to the yes it is.
Here are some excellent recipes for using your pumpkins and winter squashes. Personally, I really love pumpkin soup and pasta. And you won’t believe how much better homegrown pumpkins are compared to store bought versions.
Are you growing winter squash?
I love watching pumpkins grow. They are so gigantic! Share your experience in the comments below.


I planned on growing Accorn squash for the Newly built root cellar this year but I didn’t plan on such a long curing time so I am very disappointed.thanks for the information
Wonderfully written. Love all the tips and information. Love the way it gave information but didn’t get carried away. Thanks for putting this out there for us newbie gardeners.